Showing posts with label blogger basics. Show all posts

Wednesday, 7 November 2012

Earn Money Online in Different Ways

There are many ways to make online money. If you search the web to know different ways to earn, you will find a lot of websites telling 101 easy and free ways. I am writing this article not to tell the easiest but some effective and efficient ways to earn. Before starting I concede to readers that I don't know any way that could make one rich over a night. Rather I do believe, to become hero from zero one needs to work hard with full of energy, patience and enthusiasm. Let's have a bird view of this post. Here I have written about PPC, Affiliate Program, Freelancing very shortly.

On each making money way , I have tried to focus on the following questions:


1)how much can be earned?

2)how to start to earn?

3)time to spend each day? etc...

1)PPC Program: Pay Per Click(PPC) is an advertising program in which advertisers pay a fixed amount every time when one of the ads is clicked. You will find out some websites those give free ads to place it on your blog or website. Google Adsense, Chitika and Bidvertiser are the leading websites among them. Cost Per Click (CPC) amount varies from one to another. Usually Adsense or Chitika pay $0.11 for each click. Sometimes Adsense pays $10 for per click. CPC or CPM depends on many related issues which are not concerned in this post. Anyway, if you get thousands of visitors for your site than this way may help you to earn online hundreds of money each month.

2)Affiliate Program: Affiliate Marketing is a program in which business pay a fixed amount or a percentage for each visitor or customer bought an item of their products or you refer a new user/customer to sign up on their websites. For example Amazon offers affiliate program and it's referral rate is 4%. If visitor buys a product of $100 from your referral link, Amazon will pay you $4. Chitika rewards 10% of what of what your  referred publisher earns and pay $25 when your advertiser referral spends $100 for add campaign. To earn from affiliating program you need a blog or website, then find out the websites which offers affiliate program and before starting it I recommend you to read their program terms and conditions.  

3)Freelancing: Sell your expertise on marketplace. This is the fastest way to make money online without investment. Elance.com , vworker.com are websites that match buyers and sellers of internet provided services. Normally buyers offer projects on different fields such as computer programming, website design, graphic design, writing, copywriting, consulting, translating etc. You can earn $100 each day or even more from home.Since the projects are open for all you have to bid with proposal explaining the way to solve the problem.

List of popular networks:

How to put Adsense code in middle of blogger post

Normally each visitor visits your blog to read post. So if you put adsense in the middle or anywhere of post, ads can get clicked more frequently. It will  help to earn more $$.

To put adsense code in the blog post, it is better parse the code first.So parse it using AdParser.

After parsing,your ad code should look like this.

Log in to your dashboard--> layout- -> Edit HTML
Check on "Expand Widget Templates"

Now find out the following tag:-
<data:post.body/>
Now replace above code with below code.

<div expr:id='"aim1" + data:post.id'></div>

       <div style="clear:both; margin:10px 0">

<!-- Your AdSense code here -->

</div>

<div expr:id='"aim2" + data:post.id'>

<data:post.body/>

</div>

<script type="text/javascript">

var obj0=document.getElementById("aim1<data:post.id/>");

var obj1=document.getElementById("aim2<data:post.id/>");

var s=obj1.innerHTML;

var r=s.search(/x3C!-- adsense --x3E/igm);

if(r>0) {obj0.innerHTML=s.substr(0,r);obj1.innerHTML=s.substr(r+16);}

</script>

Now save your template.
Now in every blog post ,Put this special code : <!-- adsense --> in the place where you want to show your adsense ads.

Submit to Popular Search Engines To Boost Blog Traffic | SEO Tips

Search Engines are the source of huge amount of free traffic. Millions of People use search engine such as Google, Yahoo, MSN etc each day. To find your blog in search engines you have to submit your blog sitemaps. It does not assure that you will get a lot traffic from submission day.

Here SEO (Search Engine Optimization) is one of the great concerns to index your blog at first page of search result. Search this blog for different SEO tips to optimize your site for popular search engines. Before optimization, first and foremost duty is to submit your blog/site to search engines.

Follow the list below to submit your blog’s URL to some popular search Engines:
1. Submit to Google Search Engine. (Gmail Login required)

2. Submit Sitemaps to Yahoo.

3. Blog Submission to MSN Search Engine

4.Exalead Search Engine

5.Submit Blog Sitemaps on Ask.com Search Engine

6.Technorati (requires to sign up to claim a blog)

7. Submit to Open Directory

I hope you enjoy it. Now share it with your friends to help them.

How to add Different Meta tags to Different Blogger Posts | SEO Tips

If you are beginner in SEO and does not have any idea of Meta Tag, just read this post first about Meta Tag.It is very good for SEO (Search Engine Optimisation). Actually, why we are adding meta tags is to tell search engines what that page is all about... but, using same meta tags to all of your blog posts lessens the search engine rankings and traffic little bit.


But, if you add different unique meta tags to different Blog posts, it makes the search engines to know more about your individual blog posts and make them crawl and index your pages better and it also improves your Search engine rankings for sure ;)
How to insert Different Meta tags to Different Blogger Posts

1. Sign in to Blogger dashboard » Layout » Edit html and find out the following lines:

<b:include data='blog' name='all-head-content'/>


and add this code just below that line

<b:if cond='data:blog.url == "http://makeblogpopular.blogspot.com/"'>
<meta content='DESCRIPTION' name='description'/>
<meta content='KEYWORDS' name='keywords'/> </b:if>


We now added meta tags to the homepage. Next, you want to add meta description for another post, for example : http://makeblogpopular.blogspot.com/2009/03/how-to-add-meta-tag-to-blogger-blog-seo.html
Now, what you have to do is pasting the above three lines below the present code and changing the link,description and keywords.
So, the final code now looks something like

<b:include data='blog' name='all-head-content'/>
<b:if cond='data:blog.url == "http://inetincomeguide.blogspot.com/"'>
<meta content='DESCRIPTION' name='description'/>
<meta content='KEYWORDS' name='keywords'/> </b:if>
<b:if cond='data:blog.url == "
http://inetincomeguide.blogspot.in/2012/11/add-meta-tag-for-blogger.html'>
<meta content='How to add Meta Tag to your Blogger Blog, SEO tips to add meta tag' name='description'/>
<meta content='Adding,Meta Tag,SEO ' name='keywords'/> </b:if>


Just like the above procedure, you can add different meta tags to as many blog posts as you can.

How to redirect feed to FeedBurner | Blogger Help

Blogger can redirect feed traffic of your blog to FeedBurner feed. It will help you to track 100% of your feed traffic and interact with all subscribers with FeedBurner account. To redirect Blogger feed:

Step 1: Login into Blogger account .
Step 2: From Blogger dashboard , click on Settings tab of your blog.
Step 3: Select Site Feed tab.
redirect feed
Step 4: Now type your Feedburner Feed Url into the Post Feed Redirect URL text field. Be sure that you include http://
feedburner help
Step 5: Click Save Settings.
You are done. Now Blogger will redirect feed traffic of your blog to Feedburner feed.

How to burn a Blogger feed | FeedBurner Help

If you are not familiar with blogger feed then it may be confusing to you. So I have tried to show you full tutorial on burning a feed with FeedBurner.com. If you still confuse , just post a comment at the below of this post.

Step 1: Go to FeedBurner.com and click on Get Started.
feedburner
Step 2: Login with google account.
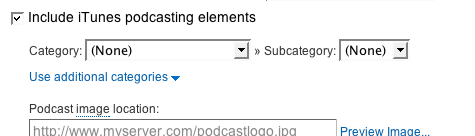
Step 3: Enter Blog address in the "Burn a feed .." form just like below image. If you plan to publish a podcast with your Blogger feed, check "I am a podcaster" box. Then click NEXT>>

Step 4: Now you may see "Identify Feed Source". There you can choose one of feed sytles feeds/posts/default or feeds/posts/default?alt=rss.
Step 5: Fill up a feed title and feed burner address as you prefer. Normally you can choose your blog title. Click NEXT>>

Step 6: Read the information on "Congrats!" . You will find a feed url there. Click NEXT>>

Step 7: If you selected "I am a podcaster" on step 3, configuration options for our SmartCast service will appear. Here you can supply categories and other information for iTunes, append a copyright message, and submit your podcast to Yahoo! Search.

click NEXT>>
Step 8: On the stats configuration page, select the level of feed stats detail you want.

click NEXT>> to finish the process. You're now ready to make your FeedBurner feed available on your Blogger site!

Add Meta Tag for Blogger

What is Meta Tag?

Meta elements are HTML or XHTML elements used to provide information about a Web page or a blog. Meta tags is placed in the head section of an HTML or XHTML document. Meta tag is used to specify the page author, page description, page keyword. Look at the following image. Here the description after title is what i used as meta tag in my blog.

meta

Why is Meta Tag?

Meta Tag is important for Search Engine Optimiziation. It helps Search Engine to index your pages more accurately in their database. It makes blog more popular by increasing more traffic. If you use accurate keyword as meta tag , search engine will try to bring your pages at 1st page. Here is process how to add meta tag in the blog of your blogger.

Steps To Add Meta Tag

Step 1: Login to Blogger.com then go to Dashboard.

Step 2: Go to Layout Tab.

Step 3: Go to Edit HTML tab.

You have to insert the following code.

<meta content='DESCRIPTION HERE' name='keywords'/>
<meta content='KEYWORDS HERE' name='description'/>
<meta content='AUTHOR NAME HERE' name='author'/>

DESCRIPTION HERE: Insert description of your blog or site here.

KEYWORDS HERE: Keywords that describe your blog well.

AUTHOR NAME HERE: Your name or Blogger name.

Step 4: Now find out the following line: <b:include data='blog' name='all-head-content'/>

Step 5: Now insert the meta tag after the above line.

meta tag

You are done. If you still confuse , search for Meta Tag Generator.

How to Make Fast Money Online Legally

You can make money online relatively quickly, but it is not easy and will require that you have some money available to spend. This method is simplified so anyone can understand it. However those who are new to making money online should not use it because if you do not do it properly, you can lose a lot more money than you will make. Newbies should instead find a method for making money that is more long-term.

Instructions: 

  1. Create a website. If you do not already have a website, you will need one. The fastest way to do this is to create a free blog. Go to a site such as Blogger or Wordpress and make a blog. Pick a topic you know well and can write about.

  2. Fill the blog with content. The content does not have to be extensive, but it should prove that you are a real person and that you have good command of the English language. You won't actually be using this blog to make money; you will be using it to get approved for programs.

  3. Register with a CPA (cost per action) network. Go to a company such as Neverblue or FluxAds and sign up. They will ask you for your website address, so make sure the blog you created is up and running. These companies provide you with offers to promote. Each offer will pay you based on how many people you get to sign up for a free or paid offer, a trial, or a request for more information (i.e. pay per lead) or how many sales you make (i.e. pay per sale).

  4. Wait for approval. Once you register with offer companies, you will have to wait to be approved. Some companies will require a phone call. Sometimes they will call you, other times you must call them.

  5. Register with Google AdWords. While you are waiting for approval, sign up for an account with Google AdWords. This is what you will be using to get leads and make sales.

  6. Log in to your CPA network account. Once you are approved with a company such as NeverBlueAds or Flux Ads, you will log in using the information they give you. You can then begin to view offers to promote.Log in to your CPA network account. Once you are approved with a company such as NeverBlueAds or Flux Ads, you will log in using the information they give you. You can then begin to view offers to promote.

  7. Select the offers to promote. Select one offer and stick with it until you get more experience. Once you have the offer, write up a few different ads that you think will get people to try it. The ads must be short as per Google AdWords guidelines. You also will need to select search terms you want to bid on. For example, if you are promoting an offer for free chocolates, you might jot down terms such as "free chocolates" or "chocolate freebies." The more specific the terms, the better.

  8. Log in to AdWords and begin to bid on search terms. Select the terms you are bidding on and how much you are willing to pay each time someone clicks on the ad. Next, enter the ad copy you wrote for each term and the URL of where you want the person clicking on the ad to go. Wait for Google to approve the ad and get it running.

  9. Monitor your sales and your spending. You will pay each time someone clicks on the ad; no matter if they complete the offer or not, so you must carefully watch your spending. Analyze which keywords and ads are getting clicks and sales, and which are not.

Tips & Warnings

  • If you are not in a hurry to make money quickly, there are many options for making money online. One of the best options is to use the website you created on a long-term basis to generate revenue by either offering sponsorships, running pay-per-click ads or promoting the offers you signed up with.

  • Some offers do not allow you to use pay-per-click advertising to promote them. You will need to check each offer individually to find out if you are able to use this method.

  • You may not be able to link directly to the offer. Google may require that you link to your own website and then from there you link to the offer. If that's the case, then you should create a separate website whose only purpose is to promote that offer. Do not spend money to promote a site that does not have a targeted focus.

Sunday, 9 September 2012

List of Adsense Revenue Sharing Sites - Earn Extra Money

In the last post we have seen about how to start adsense revenue sharing program on yousaytoo.com . Now i am going to tell you about some other sites which also allows adsense revenue sharing program so you can also earn through these sites too.By taking part in the Adsense Revenue Sharing communities and websites, you have a great way to earn extra income. Often the Adsense revenue shared is between 50 and 100 percent for the content that you add to the specific site. This content could be in the form of a forum thread that you start, an article, a video or picture, a blog, or other types of content.If you spread your efforts across different sites, you could make some decent income. It is also an effective way of generating income for your own site by giving the visitors an incentive to contribute and keep returning.

  • AdSensigg – AdSensigg = AdSense + DIGG-like (interesting idea) – 50% Adsense Revenue Share
  • Dosh Dosh – Invite only revenue sharing community – Unknown
  • Free Ads with Adsense Revenue Sharing – Interesting link building venture – Unknown
  • FunAdvice – Advice and answers site – Unknown
  • Google Earth Hacks – Google Earth hacks forum – 75%
  • Hub Pages Publish information on a topic you love to write about – 10% (oh boy!)
  • Trend Hunter Report trends that you find – 100% New!
  • Senserely Yours – An entire community based around sharing Adsense Revenue – Unknown
  • That’s Pretty Dumb – Highlighting the stupidest things businesses do to us –100%
  • QooForum – A general forum about anything and everything – 50%
  • Vubx.com – A gadgets article and blog site – 75%
  • You Say Too – Revenue Sharing Community – 50%

Blogging

Music

Rating Sites

Rights and Advocacy

Articles

Domain/SEO/Advertising/Webmaster Sites

Home Improvement

News

Social Networking

  • Google Knol – Wikipedia-like site by Google – 100%
  • FriendTrain – social media site – Unknown
  • Lensroll – Directory of Squidoo pages – 50%
  • Squidoo - An excellent social media site – Shares revenue based upon various criteria *very good source of revenue!
  • Qassia – Articles Submission and social media – 100% New!
  • Tagfoot - Excellent social bookmarking site – 50%+ New!
  • Xomba - Make posts, share links with other Xomba users – 50%

Sports

IT, Tech-related

Video and Photo

What is Adsense Revenue Sharing Program

Must check this trick for creating Adsense Account Trick to Create an Adsense Account In Few Hours .


What is Adsense Revenue Sharing Program

I have already posted about earning through google (adsense) in which i have completely explained about how to put the google ads on your blog.Now i am going to tell you about another way through which you can earn more using your adsense account.This method is particularly useful for those people who dont have a running blog so couldn't get much through adsense.This method is called Adsense Revenue Sharing program.

Have already heard anything about Revenue Sharing Sites?

Revenue Sharing Sites are sites which place ads (particularly from adsense) of its members throughout its website. The site ads and the member’s ads impressions will be divided according to the site’s rules. Revenue Sharing Sites can be a Social networking, Forum or Article Marketing Website.

Does it violate TOS of Adsense?

As of now, I haven’t found any conflicts of this concept to the TOS of Adsense. If you are worried that this might be an illegal way of earning in adsense then as of now, it is not directly define in any sentences within the TOS of adsense. There are a lot of Revenue Sharing sites that exist for a very long time now. A very popular Revenue Sharing Forum Site is the DP or Digital Points.

DP is doing this concept for how many days and months still, there are no reports from its members of getting suspended by adsense because of joining the site. Getting to Know Revenue Sharing Sites As I have said, this kind of site can be in form of forum, social networking or article submission site. Adsense, as we all know can pay you by the number of page impression who have made with their adsense placing on it. In a forum revenue sharing site, it works based on your activity. If you post messages on discussions or making your own discussions, every time a visitor hits and read that page and your ads is currently in display, you have a great chance on earning from it.

The key on this kind of forum sites is to be active and make discussions that are interesting. For social networking site, it works when someone view your profile. Some other sites would offer a random placing of ads on the top of their every page. For article submission sites, it works when someone view your article. The ads will match to the article that you have made, so the possibility of ads getting click by the reader is very high.

If you are an adsense user and you think that your blog or website traffic is not enough to make a good traffic to earn with your adsense, you may want to try on joining to this Revenue Sharing Sites.

If you have any confusion about adsense revenue sharing program then ask here.

Monday, 9 July 2012

Who is a New Bloggers or Web owners

Who is a new blogger or  web owner?

  1. Your Blog or website is just one year old
  2. Your Blog has a PR less than 2
  3. Your Alexa Rank is > 100,000
  4. You receive 100-300 visitors daily
  5. Total number of your posts are less than 60-50

If you fit into this category and you lost your account then you don't have to worry because you honestly have lost nothing! Without 1000-10,000 daily visitors, Adsense or any other Ad service is meaning less. It will take 5-6 months for you to make just $50-100 if you fit in the above category. So what should be the best solution for you?

You still can make your dream come true and earn a happy living online by taking these steps:

  1. Make a new Gmail Account with different First and Second Name and Personal Info.

  2. Setup a New blogger account with the new Gmail ID

  3. Delete your Old Blog and Import your old posts to this new one by making serious Editing. Do not republish those posts with the same titles and starting paragraph and blogger images. Shuffle the paragraphs. The best idea is to rewrite them in different words. I know this will take long but you can do that within a week if your posts are no more than 50.

  4. If your blogger account and Gmail ID is not very old and crowded then the best is to delete both of them and make a new fresh start. Don't worry this step is smart long term one, it will hurt you at first but you will be in a much better state later.

  5. If you want to keep your blogger account and Gmail ID then its better to set up a blog with upgraded Wordpress and not the free one.

  6. Do not Link to your old blog after you have set up the new one.

How am I so sure of these steps? My own home buddy lost his Adsense Account. He receives 16000 daily visitors by sharing security threat articles. He set up a blog on wordPress and now he is receiving 2000-3000 visitors on the new blog with $2-4 per day, which is not a bad startup. 

Friday, 6 July 2012

How to Making Money With Your Blog

Last but not least, you will be adding the very popular Google AdSense to your blog. Content-related ads are placed on your blog in the location you choose. If someone clicks those ads, you get paid.  Although it sounds simple enough and is easy  to add to your blog, you should think about it carefully before making that decision. I originally had Google AdSense installed on my blog. However, I was using McAfee Site Advisor ( siteadvisor.com) which rates search engine results and basically gives the “OK” to click a site found. It gave my site a status of Caution or Unknown. I realized it was due to Google AdSense.

When I removed it, my site passed and got the green checkmark of approval. Although I know not
everyone uses Internet browsing safety tools like McAfee Site Advisor, I didn’t want there to be any chance of my site not being visited. Therefore I removed Google AdSense.

However, if your sole purpose of your blog is to make money and you want it to be loaded with ads, Google AdSense is free to install and will insert content-related ads to your site. Another point to keep in mind is that depending on your blog’s purpose and your type of business,
you may be inserting ads linking to your competition. Google AdSense will insert money making-related ads, and in doing so may insert a link to a competing online earning. Would you really want to do that? No! Again, installing Google AdSense is simple, as you will see in the next exercise, but the decision to add it to your site is not.

How to add Adsense account:

Add Google AdSense to make money:

  1. From the Dashboard, go to Monetize
  2. Select a location for your ads. In our example, The Online Earning Tutor, the second bullet was chosen (in the blog’s sidebar).
  3. Click Next. 
  4. Click Create a New AdSense Account.
  5. Enter all information including your name, address, country, etc.
  6. Click Submit Information.

Make money with Adsense

adsense apply

7.   On the next screen, verify that the information is correct.
8.   Click Create Account.
9.   Review the Terms and Conditions.
10.  Check the box at the bottom about accepting the terms.
11.  Click the I Accept button.
12.  On the next screen, your AdSense account is enabled on your blog, however they will not appear on your blog for another 48 hours.
13.  Click Edit Layout to move it around in your sidebar. 

14. Click Save.

image

how to add meta tags to blogger

In this  exercise, you  will add meta tags to  your  blog:

  1. From  the Dashboard, go to  Design, Edit HTML.
  2. Scroll down to find  the HTML  code  “<head>”.
  3. Enter  the following code, but replace  with keywords  and descriptions  that  best  suit
    your  blogging needs:

<head>

<meta name="keywords" content="online earning,internet earning,earn money,blogging guide,blogger,blog setup,SEO,search engine optimization,money earnings" />
<meta name="description" content="Online Income Methods and Guide." />

4.  Click Save.

Page Elements or Add a Gadget in Blogger blog

When entering the Design portion of your blog from the Dashboard, you  will see three tabs: Page
Elements, Edit HTML, and Template Designer. Page Elements displays a  visual layout of your blog and where all your gadgets lie. A gadget is an item in your blog’s layout. When you first created your blog, there were gadgets that Blogger automatically inserted into your blog’s layout About Me, Followers, Archives, and Page  Header (the banner area which currently displays
your Blog’s Title and Description previously entered). Gadgets can be deleted at any time. We discuss gadgets in more detail later in this post. In addition to the existing gadgets  in your layout, there are other elements or areas of your blog that we'll review, such as the Navbar, Header, Blog Posts, and gadgets like a Search Box.

1. Navbar
The Navbar is a built-in feature of your blog used to quickly navigate to your Design, compose a New Post, or to Sign Out, and displays your email (username). On the left side on the Navbar when viewing your blog, you will also see an area to report abuse, or the ability to go to the next Blogger blog. In the Navbar page element, you can edit the Navbar color to best match the coloring of your blog. The only option when editing the Navbar (without  using custom HTML/CSS code) is choosing a color. I would recommend one of the “transparent” settings

Navbar configuration

2. Gadgets
In the way posts make up the majority of your blog, gadgets make up the majority of your blog’s layout, particularly the sidebar(s). We will begin with basic gadgets available from Blogger when clicking Add a Gadget. In the next chapter and throughout the remainder of this book, you learn how to add additional third-party gadgets  to promote your blog, connect to popular social networking sites, make money, or further customize the design or functionality of your blog.

add a gadget

Let’s review a list of commonly used gadgets and then add a few popular gadgets to your blog, such as a Search Box, in the following exercises. You do not want to clutter your sidebar(s) making your blog appear too busy, nor will every gadget suit your blog’s purpose or appeal to all blog readers. Pick and choose those that you need and from which you will benefit. 


Gadget

Description

Pages

Allows you to create content on your blog separate from  your main post area. It is similar to the traditional web page describin g a service you may offer, list products you sell, or a custom About Me or About Us page

Followers

Displays a list of people following your blog (in their Dashboard under Other Blogs, it will show your blog updates).

Search Box

Adds a Google Search box to your blog allowing visitors to quickly and easily search your blog.

HTML/JavaScript Primarily used to add third-party gadgets to your blog.
Adsense Provides capability to  earn money with your blog by adding Google AdSense.
Picture

Use this gadget to add a picture to your blog’s sidebar, footer , or header area (in addition to your Profile Photo). This gadget is not used to insert an image into a Post.

Slideshow

Creates a quick slideshow from Picasa Web Album, Flickr, Photobucket, or other photo storage sources.

Link list Creates a link to your favorite blogs, web sites, photo albums, or other links.
Labels Displays a list of categories (labels) used in your blog posts.
Subscription links

Allows a reader to subscribe to your blog’s posts or comments using popular readers like Google Reader.

Profile

Allows you to add certain profile information to your blog, including the Profile Photo if one was uploaded.

Blog Archive Select how to archive your blog’s posts; most commonly is by month.
Page Header Add a header area to your blog. Your blog banner would typically go here.

3. Search Box
In the next exercise you will  add a Search Box to your  blog allowing readers to quickly  an d easily search your blog. You  want to keep them on your site as long as possible, and allow  them  the  ability to  find what they need especially if you are selling product or  promoting  an event on  your site. This  gadget uses Google, which can be advantageous.

How to add Search box:

After blogging for a while, you  will have many posts, labels (categories),  and archives.  Adding  a Search  Box allows visitors to quickly search your blog without scrolling or visiting many labels trying to locate what they are looking for. They can type in a word or phrase and click  Search to get results. Search box in blogger

  1. From within Page Elements in  the right  sidebar  (right-side  column  of  your  screen),
    click  Add a Gadget at the top  of the column.
  2. From  the Basics list, choose Se arch  Box
  3. Check “This Blog” since the purpose of the exercise is to allow visitors the ability
    to search your blog. However, you may also like using the search engine to search
    pages you’ve linked to or to search the Web as well. In our example, all three have
    been selected. 
  4. You can also change the Title of the gadget. The default is “Search This Blog”
    used in our example. Another preferable option is “Search My Blog.” 
  5. Click Save.
  6. It is now added to your sidebar, the first/top item.
  7. Drag the gadget to a new location and drop (or release your mouse) in the new
    desired location (above Blog Archive).
  8. Click Save.
  9. Again and after any change in your blog’s layout, click View Blog to see your
    changes live.

Why Use Google Blogger

There are a few popular blogging platforms including Blogger, Typepad, and WordPress. So why use Google Blogger? The number-one answer is because it is free. In additi on, it is easy to learn and user-friendly. 

image Typepad requires you to purchase an unlimited package (US $14.95 a month) to be able to install a custom background and have full customization control. WordPress.com charges US $15 a year for a CSS (Cascade Style Sheet) upgrade.  But Blogger allows you to cust omize your banner, background, posts, and footers (just about any aspect of your blog ) for free. You have complete control of your blog, its elements, and functionality.

Google Blogger is a user-friendly blogging platform  with all the bells and whistles. What more could you ask for?

Sunday, 1 July 2012

How to Start a Free Blog at Blogger.com

Step 1: Sign Up to Create a Blog at Blogger.com

Visit the Blogger.com home page and select the "Create Your Blog Now" button to begin the process to start your new Blogger.com blog.

Step 2: Create a Google Account


If you don't already have a Google account, you'll need to create one by completing the form on this page.


Step 3: Sign In with Your Google Account


If you already have a Google account, you can bypass the "Create Google Account" step and simply sign in with your existing Google account username and password.


Step 4: Name Your New Blog


Enter the blog name and corresponding domain name (to precede '.blogspot.com') in the spaces provided.


Step 5: Choose a Template


Select a standard template your new blog.


Step 6: Congratulations - Your New Blog is Active!


Your blog is now live and ready for you to start writing content.


Step 7: Write Your First Post


That's all there is to it! You're now ready to write your first blog post in your new Blogger.com blog and join the blogosphere.